Showing posts with label nails. Show all posts

Thursday, July 15, 2010

Review: Rimmel Fruities


(Excuse the dodgy cuticles! Hadn't planned to do my nails but it just sort of happened! )

I popped into Boots today as I got paid and fancied treating myself. I've been wanting a pale yellow nail varnish for ages so that was the plan... And that's what I got - but with a twist!! It's scented!! How cute is that?? It's the Rimmel Fruities lasting finish in shade 058 Lemon Drop. I also picked up the pink (025 Strawberry Fizz) while I was at it.

The coverage is pretty good but I did 3 thin coats over a base just to be sure. Not so sure about the smell of the yellow one but the pink is nice enough. Smelling my nails non stop probably looks a bit weird though!

Glad I bought these for the novelty factor and the colour and coverage are good so I'm happy! :)

Monday, June 14, 2010

Hints for Nails

Here are some hints I have picked up from other blogs in my quest to get better at nails and hopefully being able to do some 'Nails of the Day' (NOTD) posts down the line!

Start Clean!
Use nail polish remover to clean any remaining oils, dirt or even hand lotion from the surface of your nails before polishing. Even tiny amounts that you cannot see will cause the polish to not stick and potentially ruin the final result. Nail varnish remover wipes are great for this and if you aren't actually removing existing polish one wipe should do all your nails! I also use a nail varnish wipe on the top of an orange stick to help clean under my nails and feel it makes them even cleaner!

Precise Polishing
It takes some practice, but try placing the brush on your nail just ahead of the cuticle and gently press down on it, pushing it toward your cuticle line, just stopping short of touching it with polish. Then draw the brush toward the end of your nail, bending the brush over the nail end a little. This will apparently allow you to get a nice clean line of polish along your cuticle and drastically reduce the amount of cleanup needed - but I think I need a bit more practice!

Polish Cleanup
As you paint your nails, you can use the edge of your fingernail (if you have any length to them) to clean up around the very edge of your nail while the polish is still wet. Simply press gently on the cuticle and wipe along the cuticle line, using a sweeping motion. Keep a pad moistened with removed handy so you can keep your 'cleaning' nail clean or you will just spread it around.

Another method that apparently works even better is to use the beveled end of an orange stick moistened in remover to clean up little 'oops' spots. Wipe the stick tip on a nail varnish wipe (or paper towel or cotton pad moist with remover) to keep it clean.

A third method I have seen suggested is to get a lip balm stick and use this to essentially 'line' around the nail to ensure that any stray varnish can't stick to the surrounding skin.

Nail Surface Prep
Use a four-way buffer to remove ridges and smooth the surface of your nails. It is not necessary to go for high shine if you are going to use polish anyway. In fact, the slightly roughened surface of your nails will adhere to polish better, making your manicure or pedicure last longer. Be careful not to dig too much into the nail surface with the buffer or ridges will result when the nail grows out.

Use A Good Basecoat
It's really tough to get a good, consistently smooth finish on your nails if you don't use a ridge-filling basecoat under your color. A few of you are lucky enough to have very smooth nails, but most of us don't, so the basecoat tends to smooth out imperfections, and it gives the polish something to stick to, not to mention that it protects your nails from staining. This is particularly important with darker or more vivid colours as nails can be left stained and it takes forever to get them back to their old selves!

Use Good Lighting
It' difficult to good a good job of polishing if you can't see what you are doing well. Use a good light when you do your nails. If you have good lighting you will be able to see the spots where you missed and be able to fix them right away. (Unlike when I do my nails in bed at night and then the next day see all the streaks when it's too late to fix them! :( )

Roll Your Polishes - Don't Shake!
Shaking a bottle of polish fills it with little bubbles that take quite a while to settle out. Bubbles will result a in less than perfect finish. Instead, roll the bottle between your palms for 30 seconds or so before you use it to mix up the ingredients and give the polish more consistency. In addition to this, store your bottles of polish standing up. This helps keep the tops clean and also reduces leakage and sticking of the cover.

Use A Good Topcoat
Glossy or matte, a topcoat will seal the polish and protect it from chipping and wear. Clear topcoat does not have pigment it in, and so it is stronger than colored polish, and it lasts longer. Many topcoats also speed up drying time, so another great advantage. In the case of a good top coat you will find that it magnifies the color, so your nails will look like they are wet, even when dry. It gives a much sleeker/classier look in my opinion!

Take Your Time
A good result takes time and there is no way to rush it. Wait 5 - 10 minutes between coats so they can set before the next coat, or adding polish will simply pull and partially remove the first coat when you apply it. I find that doing a few thin coats is best as it takes longer for a thicker coat to dry. Even if applying it thicker does mean you need to do less coats overall, does it really matter when it's still using the same amount of varnish??

An obvious hint is that allowing the coats to dry will also speed up the curing time - the point where the polish no longer is susceptible to smudging. Multiple coats of relatively wet polish will stay soft for hours, exposing your mani or pedi to damage well after you thought they were dry and hard. Much as I like to paint my nails, it's no fun having to do a polish job over again. Doing it once is fun, doing it twice is too much like hard work!!


Have you any other hints that you think should be added to this??

Sunday, May 23, 2010

Nails Inc offers (May 2010)

Recently InStyle Magazine had an offer where you got a free nail varnish. Despite having LOADS of nail varnish I had no 'nude' colour that I could put on and forget about no matter what the outfit so one of the three colours being offered by InStyle caught my eye and after much watching out I managed to track it down.

(From L-R: Mink, Beach and Candy)

I had never heard of the brand, Nails Inc, and to be honest figured it was some cheapo brand looking for publicity. How wrong could I be?? Well, InStyle retails for €5.21 and Nails Inc varnishes retail for €15.44 in Boots. Essentially this means that had I managed to buy all three colours I would still only be forking out the cost of one of these fabby nail varnishes!

Mink was my colour of choice and I am loving it. The varnish has a lovely shine to it and lasts really well in comparison to other brands I have used! InStyle Mink is “greige”, the colour of the season and perfect to go with the current nude fashion palette. Unfortunately these polishes were created specifically for the InStyle offer so when it's gone, it's gone!

Bearing that in mind, just imagine how happy I was when I stumbled across another Nails Inc offer! Diet Coke and Nails Inc are currently running an offer in Boots (which I believe is going on until June 30th but don't quote me!) where if you buy 2 500ml bottles of diet Coke (€1.40 each) you get one of 4 nail varnishes (subject to availability) which were custom made for this offer!


(L-R: London, Paris, New York, Milan)

The 'Diet Coke City Collection' is a collection of four colors inspired by the four fashion capitals of the world – London, Paris, New York and Milan. The nude tone is said to depict the cool fashion of Brits living in London, while the deep purple that represents Paris is made to represent a sunset over the Eiffel Tower. New York is the city that never sleeps and to put that tagline into color form, it’s vivid fuchsia and Milan is depicted in a fiery Italian red hue.

Originally I had just wanted to get the London polish but this was such a bargain (I actually do drink diet Coke) that I ended up getting all four. Surprisingly I am actually loving the New York hot pink shade (which my lovely friend referred to as 'homewrecker pink') so have that adorning my nails at present! I think this is a brilliant bargain so will possibly even pick up a few more should I be buying diet Coke in Boots over the next 6 weeks!

Friday, March 26, 2010

Nail Varnish Stash

It's coming into summer... In fact, we officially enter summer time this weekend!! One of the things that is quintessentially summer to me is painting my toenails and as a result I have a pretty decent collection of nail varnishes - 32 in total! (Bet you're surprised to hear that!!)


(My collection of Nail polishes)

Most of my nail varnishes are Rimmel. The first Rimmel nail varnish I purchased was for my Debs in 2000 and I have to say I haven't found any that match their quality so far. I honestly can't think of any flaw with them. They have a great selection of colours which attract me back again and again and last for ages. They also have a new brush on the 'Pro' range which I have fallen in love with as it is a wider brush, making application so much easier. Other brands I have randomly accumulated and include in my current stash include H&M, 17, Natural Collection, Gosh and Avon.

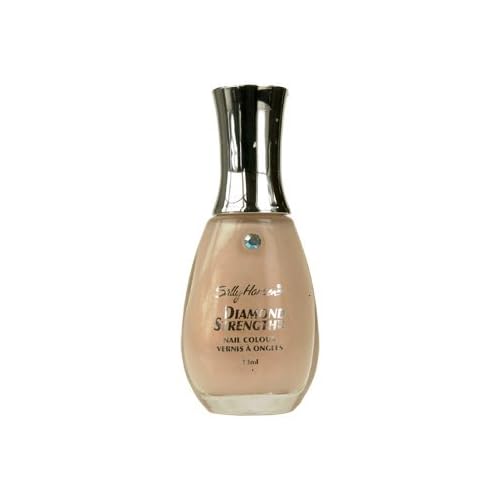
Due to work I tend not to paint my finger nails too vivid a colour so my collection includes a number of clear nail varnishes and one or two slightly tinted ones. Out of these my Sally Hansen Diamond Strength polish is my favourite as it is slightly irridescent and has a lovely shine to it without being too obvious. I know Sally Hansen nail polishes can be a bit hit and miss however so I'm counting myself lucky that this one has worked out for me!

Monday, March 8, 2010

Home manicure

Have made a vow to myself to try keep my nails in better condition and went for a manicure in my beauticians not that long ago. To be honest, I wasn't that impressed! The nail polish was applied too thickly and as a result smudged over 2 hours later when it should have been well dry in my opinion. During my decluttering I had organised all of my nail varnishes and emery boards, orange sticks and so on into easily accessible containers so one of the days last week I decided to give my nails a tidy up myself! We're in a recession y'know!

All I needed was:
Nail varnish removal wipes
UltraBland cleanser (Lush)
Ocean Salt Scrub (Lush)
Lemony Flutter Cuticle Butter (Lush)
An orange stick
An emery board
and a neutral shade of nail varnish (Sally Hansen Diamond Strength Nail polish in Brilliant Blush)


  • First step was to make sure my nails and hands were clean so I just gave my nails a wipe down with a nail varnish remover wipe before giving my hands a thorough washing.
  • I then covered my hands in UltraBland cleanser and scrubbed them well with Ocean Salt Scrub before giving them another good washing.
  • Following this I put a good amount of Lemony Flutter on each finger nail making sure to cover the cuticles well and left it on them while I went about the house doing some bits and pieces - probably for about 30-40 minutes in total - before massaging it in.
  • At this stage I set to work with the orange stick and pushed back each of my cuticles well, tidying them as I went. I added a small bit more Lemony Flutter to each nail and then started on the boring job of filing.
  • Once each nail was done I massaged in the remaining Lemony Flutter and again washed my hands giving a quick tidy again with the orange stick where needed.
  • At this stage I have to admit my nails were looking pretty well so all that was left was to add a few coats of the nail varnish. I prefer to add 3-4 coats of varnish thinly over time than do two thick layers as they did in the beauticians. I find it dries faster, leaving it less likely to smudge and you get a more even colour overall.
I did this last Wednesday and it is now Monday and none of the nails have chipped so I'm pretty impressed with myself! Perhaps with a little practice in time I will even be able to perfect the painting of white tips and be able to give myself a french manicure!!